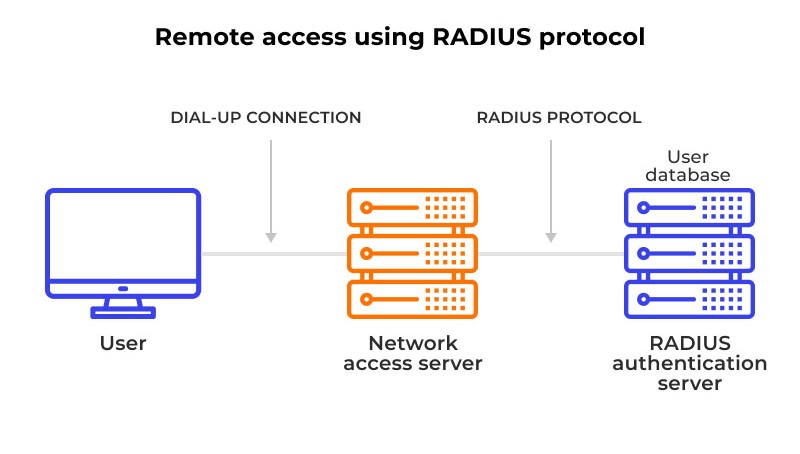
Setting up a Microsoft RADIUS (Remote Authentication Dial-In User Service) server involves configuring a Network Policy Server (NPS), which is the Microsoft implementation of RADIUS. NPS allows you to centralize authentication, authorization, and accounting for network access requests.
Here’s a step-by-step guide to configuring a Microsoft RADIUS server using Network Policy Server (NPS) in Windows Server:
Prerequisites:
- Windows Server (any version from 2008 onward).
- Administrator access to the Windows Server.
- NPS Role installed on the server.
- Active Directory (if using AD authentication).
Step 1: Install the NPS Role
- Open Server Manager.
- Click Manage and then select Add Roles and Features.
- In the Add Roles and Features Wizard, select Role-based or feature-based installation.
- Select the server you want to install the NPS role on.
- On the Select Server Roles page, expand Network Policy and Access Services.
- Select Network Policy Server and click Next.
- Proceed through the wizard and click Install.
Step 2: Configure NPS as a RADIUS Server
- Open the NPS console:
- Press Win + R, type
nps.msc, and press Enter.
- Press Win + R, type
- In the NPS console, right-click NPS (Local) and select Register server in Active Directory. This step is necessary to ensure NPS can authenticate users using Active Directory.
- Click OK to confirm the registration.
Step 3: Add a RADIUS Client
The RADIUS client is the device (such as a wireless access point, VPN server, or network switch) that will send authentication requests to the NPS server.
- In the NPS console, go to RADIUS Clients and Servers > RADIUS Clients.
- Right-click RADIUS Clients and choose New RADIUS Client.
- Enter a Friendly Name (any name to identify the device).
- Enter the IP address of the client (the device you want to authenticate).
- Set a Shared Secret. This is a password that the RADIUS client and the NPS server will use for encryption. Make sure to configure the client device with the same shared secret.
- Click OK to save.
Step 4: Configure Network Policies
Network policies determine who can access the network and under what conditions.
- In the NPS console, expand Policies and then click Network Policies.
- Right-click Network Policies and select New.
- On the General tab, provide a Policy Name and set the Type of network access server (for example, Remote Access Server (VPN) or IEEE 802.1X Wireless).
- Click Next.
- On the Conditions tab, you can define conditions like:
- User group (e.g., only members of a certain AD group can authenticate).
- Connection type (e.g., VPN, wireless).
- Client IP address, etc.
- On the Constraints tab, you can configure additional settings like:
- Encryption levels.
- Authentication methods (e.g., EAP, MS-CHAP).
- On the Settings tab, you can define settings like:
- Accounting settings.
- Idle timeout.
- Bandwidth constraints.
- Review your settings and click Finish to create the policy.
Step 5: Configure Connection Request Policies (Optional)
Connection request policies determine how incoming RADIUS requests are processed.
- In the NPS console, expand Policies and then click Connection Request Policies.
- Right-click Connection Request Policies and select New.
- On the General tab, provide a name for the policy.
- On the Conditions tab, specify conditions (like client type or IP address).
- On the Actions tab, specify whether to forward requests to another RADIUS server (if you have a multi-tier setup).
- Click Next and then Finish.
Step 6: Configure RADIUS Accounting (Optional)
You can enable RADIUS accounting to log authentication attempts, successes, and failures.
- In the NPS console, go to RADIUS Accounting.
- Right-click RADIUS Accounting and select Properties.
- Under the Log File tab, you can configure where accounting data will be logged (e.g., SQL Server, text file).
- Under the Log on Success and Log on Failure tabs, configure how to log events.
- Click OK to save your settings.
Step 7: Test the RADIUS Server
Once everything is configured, test the RADIUS server by attempting to authenticate through the client device (for example, by connecting to a VPN or Wi-Fi network).
- Verify that the NPS server is reachable from the client device.
- Check the Event Viewer for any logs related to authentication attempts.
- Open Event Viewer (type
eventvwr.msc). - Navigate to Windows Logs > Security to see authentication events.
- Open Event Viewer (type
- If any errors occur, review the configuration steps to ensure the shared secret, policies, and conditions are correctly set up.